There are two basic types of welders: a stick welder and a wire feed welder. When you are learning how to use a wire feed welder for the first time, you must start off with a easy to manage and control machine, which will essentially make learning easier.
 For the beginners still learning the terms. Most will often use wire feed and MIG welding interchangeably.
If you haven't already, I highly recommend you getting yourself a reference guide. Even as a seasoned welder you'll still reference the guide. So best to find one you like as you are getting started as you'll use it for a lifetime. Really any of these ones will work great. It just all comes down to preference. This is the one I use Audel Welding Pocket Reference

For more getting started books, you can find our post on our favorite welding books.
The wire feed welder is much easier to work with the first time around, compared to a stick welder. These welders and the methods have some similarities, some of which will be discussed in this article.
In this post, we are assuming you already have a wire feed welder. If you need a wire feed welder that is more suited for a beginner we highly recommend the Flux 125 Welder
When using a wire feed welder, it is essential to ascertain how much wire will be kept sticking out at the end of the copper welding tip on the welding gun.
Press the trigger of the MIG welder gun until approximately 6mm electrode wire. If it sticks out more, we cut off the excess with welding pliers.
The recommended amount is approximately three-quarters of an inch long. To make sure that it the wire feed welder is being used effectively.
In comparison to stick welders, wire feed welders are much easier to use. However, with a stick welder, it is simpler to see where the welding is being done. Incorrect use of a wire welder may lead to the weld going off the joint. Therefore, skill needs to be developed for wire feed welding.
To avoid this problem, one must start by turning on the wire feed welder and allowing it to stay on running for a minute before you being to weld. Then start the weld and keep an eye out for blue discolorations. These are a good sign as they offer an indication that you have good penetration on both the right and left sides of the weld, rather than a situation where there is no real bonding.
Also, when using a wire feed welder, you need to set the right wire speed. This will help you to avert your future problems that may be a result of a bad set up. Finding the right wire speed is not an exact science. It requires some trial and error to get it right.
The best way to do so is by making adjustments while welding a scrap piece of steel as a tester.
Adjusting the speed is not complicated. You have to listen to the sound that the welding machine is making while laying a straight weld bead.
If the wire feed speed is too fast, most of the wire coming out of the nozzle will be red hot, and there will be a loud crack. Therefore, you have to gradually adjust your welding wire's speed until you get a constant crackling sound.
How to Hold a Wire Feed Welding Gun
The most recommended is to hold your MIG welder gun in the horizontal or almost horizontal position since it allows better control of the weld puddle, smooth and good-looking weld beads can be obtained and it optimizes the action of the protective gas on the weld puddle.
There are cases in which it is convenient to weld on pieces inclined about 10 or 20 degrees. If so, the welding is carried out in a downward direction. With this method, flatter beads are achieved and the welding speed is increased.
In MIG / MAG welding there are two modes of movement of the gun:
- Left: Gun movement goes from right to left
- Right: the direction of the gun is from left to right
These variables depend on the material and the thickness of the piece to be welded.
For welding steel or similar metals, the welding direction is not relevant. When welding aluminum, you must you the “left hand” method.
Before you being with any type of welding, you need to ensure that you have the right safety equipment. This is especially important if you are working with gas which may be the case when you use a wire feed welder. This equipment includes safety glasses, welding gloves, a leather apron, a welding bandana, a welding jacket, cuffless denim pants, and leather shoes.
You should also try to avoid any contamination of the final weld, which might also affect the efficiency of the wine feed welder. Therefore, the surface of the base metals should be cleaned very thoroughly.
Before starting your welder, make sure to check on the cables to ensure that all the connections are tightly done, and also to evaluate for any other damage. Then you need to select the electrode polarity by checking on those connections.
Once again, depending on the metal to be welded and the thickness, there are three types of filler metal transfer:
- Short circuit transfer: in this case, the voltage and amperage are at their lowest value. This technique is used with small diameter wires to weld thin plates with root passes.
- Globular transfer: the wire melts and the blood cells fall into the puddle. This technique is suitable for welding thick plates and filler layers.
- Transfer by sprinkling or spraying: in this case the voltage and amperage are increased. The technique is used under inert gas and is suitable for welding stainless steel.
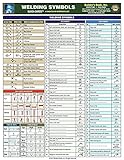
This is typically the step I like to check the welding chart for confirmation on dimensions, weld types, etc. Here is the one I use. You can get this Welding Chart on Amazon and will save you hours of time when learning to Weld. (we still use this same chart with years of welding)

The wire that you feed into the machine is also important, so you should make sure that you are using the correct drive rolls. The performance of a wire feeder can be affected by the amount of tension of the wire, so you should check on this to make sure that it is not too much or too little on the wire spool hub or the drive rolls.
Before you go fiddling with your machine, you should take the time to read through the manual and understand the best ways to make adjustments. Based on the thickness of the wire, adjust the voltage and amperage that you will use with your wire feed welder. You should be able to do this easily by referring to some reference charts.
When welding with a wire feed welder, you should use a drag technique. With this, the tip of the welding gun is pointed back towards the weld pool, and then it is dragged away from the completed weld.
Using a wire feed welder is excellent for a beginner because the technique can be picked up more easily.


